4.2 - Create digital "master files" for oversize items and bound multi-page items
- Creighton Barrett
- Shirley Vail (Unlicensed)
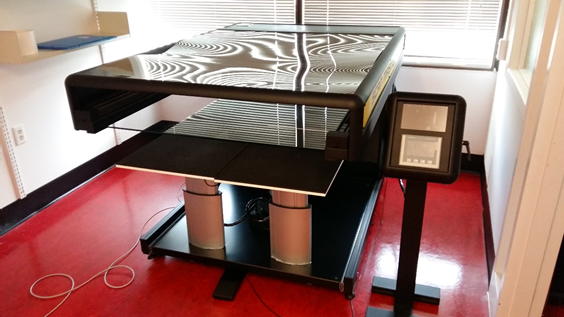
Use the SMA ScanMaster 0 to digitize oversize items (e.g., posters, technical drawings, and maps) and multi-page bound items (e.g., books, theses, ledgers, pamphlets, and scrapbooks). The scan workflow in Batch Scan Wizard has three main steps: Scan Job Setup; Scan Operation; Image Export. See the Batch Scan Wizard Manual for more guidance. Scanner operators are not permitted to use the SMA Scan Master 0 without prior training from the Project Manager or Digitization Coordinator. Scanner operators should perform scanner calibration tests on a regular basis.
Turn on SMA Scan Master 0
Turn on the SMA Scan Master 0 and prepare for scan job. Procedures to turn on and turn off the SMA Scan Master 0 must be followed in the exact order specified in this documentation.
- Turn on computer.
- Turn on main power switch in back of ScanMaster 0.
- To turn on the scanner control panel, press and hold power button on back of panel.
- Use arrow buttons on scanner control panel to lower scanning bed.
- Wipe off any dust or debris from the scanning bed.
Create a scan job
Use the Create Job window to set up a scan job in Batch Scan Wizard.
- Follow the instructions on the Create a scan job page.
- Once Batch Scan Wizard is launched, in the Scan Parameter Settings bar, select:
- 600 dpi
- 24-bit colour
- Auto crop and deskew

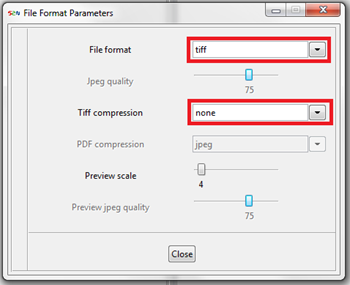
- Right-click on the 24-bit color button to open the File Format Parameters window.
- Select TIFF in the File format menu and “none” in the TIFF compression menu.
- Right-click on the auto-crop and deskew button to adjust the scanner settings (i.e., page size).
- Crop density: Defines the threshold for separating background from document. The default is 70 and should give the best results for 99% of all scans (see Section B.2.4.1.2 of Batch Scan Wizard Manual).
- Crop margin: Crops a slightly larger or smaller cutout than the neutral default setting of 0. Change to add or remove a margin (see Section B.2..4.1.1 of Batch Scan Wizard Manual)
- Scanner settings (i.e., page size): default is autoformat_docsize. Use the following table for guidance:
- Crop density: Defines the threshold for separating background from document. The default is 70 and should give the best results for 99% of all scans (see Section B.2.4.1.2 of Batch Scan Wizard Manual).
Abbreviated name | Size |
maxl | Maximum landscape |
Z1 | First 5 inches of the scanning bed |
Z2 | 10 inches |
Z3 | 15 inches |
Z4 | 20 inches |
Z5 | 25 inches |
Z6 | 30 inches |
Z7 | 35 inches |
Z8 | 40 inches |
Scan oversize items (e.g., posters, technical drawings, maps)
Note: Use Batch Scan Wizard software to operate book scanner in single scan mode or batch scan mode. Single scan mode is the preferred scanning mode for most scanner operators. It allows for efficient workflows but doesn't require the scanner operator to place their hands between the scanning surface and glass panel while the scanning surface is automatically rising. New scanner operators shoud check with their Project Manager or Digitization Coordinator before determining that batch scan mode is the appropriate mode.
- Determine the appropriate method for raising the scanning surface:
- Foot pedal: This will automatically raise the scanning surface to the proper height, but may also exert more pressure on the item. Using the foot pedal will also automatically lower the scanning surface once the scan is complete.
- Manually raise scanning surface: This will allow for more control over how the item is pressed against the glass, but also takes more time between scans. Can be a good option if multiple scans of the same item are necessary.
- Determine the appropriate scan mode:
- Single scan mode: Single scan mode is suitable for fragile or delicate multi-page bound items that require more time and care when turning pages between scans. Use single scan mode to scan the contents of a multi-page bound item “cover to cover.”
- Batch scan mode: Batch scan mode automatically lowers and raises the scanning surface at pre-defined intervals (e.g., 45 seconds) established in the Scan Job. This mode is suitable for multi-page bound items in good condition with consistently sized pages. To scan the multi-page bound item "cover to cover," scan the cover in single scan mode, switch to batch scan mode to scan the contents of the item, and then return to single scan mode to scan the back cover.
- Scan Tool: Scan Tool is suitable for multi-page bound items with uneven pages that require additional quality control (e.g., check for text distortion, skew, guttering, other issues). Scan Tool allows for multiple rescans before saving the scan as part of a scan job.
Scan oversize items in single-scan mode
Text
Scan oversize items in batch scan mode
Text
Scan bound multi-page items (e.g., books, scrapbooks, journals)
Note: Use Batch Scan Wizard software to operate book scanner in single scan mode or batch scan mode. Single scan mode is the preferred scanning mode for most scanner operators. It allows for efficient workflows but doesn't require the scanner operator to place their hands between the scanning surface and glass panel while the scanning surface is automatically rising. New scanner operators shoud check with their Project Manager or Digitization Coordinator before determining that batch scan mode is the appropriate mode.
- Determine the appropriate method for raising the scanning surface:
- Foot pedal: This will automatically raise the scanning surface to the proper height, but may also exert more pressure on the item. Using the foot pedal will also automatically lower the scanning surface once the scan is complete.
- Manually raise scanning surface: This will allow for more control over how the item is pressed against the glass, but also takes more time between scans. Can be a good option if multiple scans of the same item are necessary.
- Determine the appropriate scan mode:
- Single scan mode: Single scan mode is suitable for fragile or delicate multi-page bound items that require more time and care when turning pages between scans. Use single scan mode to scan the contents of a multi-page bound item “cover to cover.”
- Batch scan mode: Batch scan mode automatically lowers and raises the scanning surface at pre-defined intervals (e.g., 45 seconds) established in the Scan Job. This mode is suitable for multi-page bound items in good condition with consistently sized pages. To scan the multi-page bound item "cover to cover," scan the cover in single scan mode, switch to batch scan mode to scan the contents of the item, and then return to single scan mode to scan the back cover.
- Scan Tool: Scan Tool is suitable for multi-page bound items with uneven pages that require additional quality control (e.g., check for text distortion, skew, guttering, other issues). Scan Tool allows for multiple rescans before saving the scan as part of a scan job.
Scan bound multi-page item in single scan mode
- Use the control panel to lower scanning surface.
- Roll out scanning surface and place item on the front panels (cover facing up).
- Roll scanning surface back into position underneath the scanner. Use the foot pedal or control panel to raise scanning surface until the item is pressed up against the glass.
- Click on the Single Scan button in the Main Control bar to initiate the scanner.
Optionally, click on the F2 Single scan button in the Function Key bar or press F2 key.
- Allow scanning surface to lower automatically or use control panel to lower scanning surface.
- Roll out scanning surface and open item to first page spread. If necessary, place the spine of the item along the split between the front two panels of the scanning bed. The front panels of the scanning bed may be set to different levels to support both sides of the item:

If necessary, the panels can be adjusted by loosening knobs underneath the panel and moving the panels as required. - Click on the Split Page Automatically button in the Batch Scan Wizard Scan Parameter Settings bar:

- In the Split Page pop-up window, set the splitting start page to “left” and select vertical split option. Click on the Close button. This will split each scan down the middle to create two separate images.
- Use the foot pedal or control panel to raise scanning surface until item is pressed up against the glass.
- Continue scanning each page of the bound item. Between scans, lower the scanning surface, turn the page, and raise the scanning surface.
- Scan the entire multi-page bound item in batch scan mode, except the back cover.
- Allow scanning surface to lower automatically or use control panel to lower scanning surface. Close the item and place it back on the scanning surface (back cover facing up).
- Click on the Split Page Automatically button in the Batch Scan Wizard Scan Parameter Settings bar:

- Use the foot panel or control panel to raise scanning surface. Use Click on the Single Scan button in the Main Control bar or click on the F2 Single scan button in the Function Key bar or press the F2 key. Scan the back cover.
- When the entire multi-page bound item is scanned, click on the F8 Finalize job button in the Function Key bar or press the F8 key to create TIFF files in the Finalize path directory previously selected in the Directories tab of the Create Job window.
- View the progress in the Finalize Manager window and wait until progress bar shows 100%.
- Double-click on the line of the finalized job to open the Finalize path set in the Directories tab of the Create Job window.
Scan bound multi-page item in batch scan mode
- Scan the cover of the bound multi-page item using steps 1-9 of the single scan mode procedures.
- Use the control panel to lower scanning surface.
- Roll out scanning surface and open item to first page spread. If necessary, place the spine of the item along the split between the front two panels of the scanning bed. The front panels of the scanning bed may be set to different levels to support both sides of the item:
If necessary, the panels can be adjusted by loosening knobs underneath the panel and moving the panels as required. - Click on the Split Page Automatically button in the Batch Scan Wizard Scan Parameter Settings bar:
- In the Split Page pop-up window, set the splitting start page to “left” and select vertical split option. Click on the Close button. This will automatically detect the location of the book spin and split each scan down the middle to create two separate images.
- Confirm that the batch scan delay is set correctly. Click on File menu and select Edit job. Navigate to the Properties tab and adjust the Batch scan delay time (sec.) as appropriate. Use foot pedal or control panel to raise scanning surface. Using the foot pedal is preferred because it will cause the scanning surface to automatically lower after each scan.
- Click on the Batch Scan button in the Main Control bar to initiate Batch scan mode.
Optionally, click on the F3 Batch can button in the Function Key bar or press F3 key.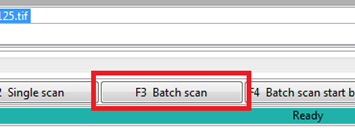
- During Batch scan mode, the scanning surface automatically lowers after each scan if the foot pedal was used to raise the scanning surface. A countdown appears in yellow at the bottom of the Batch Scan Wizard window. The following steps must be completed before the countdown ends:
- Remove previously scanned item from scanning bed.
- Place new item on scanning bed.[GC2]
- Press the foot pedal or use control panel to raise scanning bed.
- Scan the entire multi-page bound item in batch scan mode, except the back cover.
- To stop Batch scan mode, click the Cancel Immediately button in the Main Control bar.

- Close the item and place it back on the scanning surface (back cover facing up).
- Click on the Split Page Automatically button in the Batch Scan Wizard Scan Parameter Settings bar:
- Use pedal or control panel to raise scanning surface." Could add "Using the pedal is preferred because it will cause the scanning surface to automatically lower after each scan and save time.
- Click on the Single Scan button in the Main Control bar or click on the F2 Single scan button in the Function Key bar or press the F2 key. Scan the back cover.
- When the entire multi-page bound item is scanned, click on the F8 Finalize job button in the Function Key bar or press the F8 key to create TIFF files in the Finalize path directory previously selected in the Directories tab of the Create Job window.
- View the progress in the Finalize Manager window and wait until progress bar shows 100%.
- Double-click on the line of the finalized job to open the Finalize path set in the Directories tab of the Create Job window.
Scan multi-page bound item with scan tool

Export "master" files
Use the "Finalize & Delete" function to export "master" files from Batch Scan Wizard at the end of a scan job.
Note: Batch Scan Wizard saves all images in an intermediate storage area called the "Capture directory." The capture directory cannot be modified during an existing scan job. Do not change, move, edit, or delete files in the capture directory.
- The "Finalize and delete" function performs the following tasks:
- Exports all images with file names and index files to the Finalize path (set in the Directories tab of the Create Job window).
- Deletes the whole scan job, including the scan profile.
- Deletes the contents of the capture directory.
- Deletes the scan parameters, index settings, and used variables.
- To export "master" files from Batch Scan Wizard, select "Finalize & Delete" from the Finalize drop-down menu (Ctrl+Alt+J).

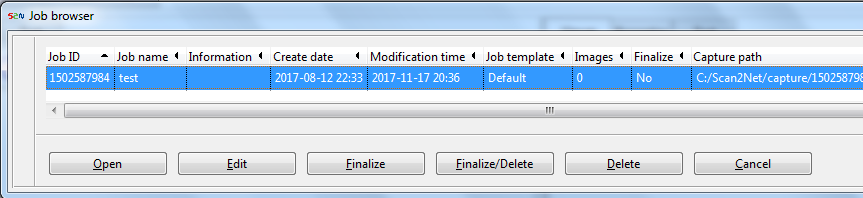
- Or open the Job browser, highlight the job, and select "Finalize/Delete.
- To export "master" files without deleting the scan job and temporary files, select "Finalize job" from the Finalize drop-down menu (Ctrl+J). Or select the F8 function key.

The "Finalize" function will only export all images and index files to the Finalize path by copying and naming the files in one process. It will not delete the scan job or images in the capture directory. - See the steps to backup data for guidance on how to delete scan jobs and images in the capture directory.
Turn off SMA Scan Master 0
Turn off the SMA Scan Master 0 and turn off the computer. Note: Procedures to turn on and turn off the SMA Scan Master 0 must be followed in the exact order specified in this documentation.
- Wipe off any dust or debris from the scanning bed.
- Use arrow buttons on scanner control panel to raise scanning bed.
- Close Batch Scan Wizard.
- To turn off the scanner control panel, press and hold power button on back of panel.
- Turn off main power switch in back of ScanMaster 0.
- Turn off computer.