17.2 - Image herbarium specimens
Note: camera operators must complete the procedures for preparing herbarium specimens for digitization before completing these steps.
Note about equipment and file formats
- The Libraries digitizes herbarium specimens with a mobile digital photography kit that includes:
- Canon T6i digital camera
- EF-S 35mm f/2.8 Macro IS STM lens
- Copy stand
- Genaray SpectroLED lighting kit
- Laptop computer
- DxO PhotoLab editing software.
- Contact the Libraries' Digitization Coordinator for training and booking inquiries.
- TIFF is the preferred file format for long-term preservation of digital images but digitization projects that involve digital cameras must first produce a camera RAW file that can be processed in RAW editing software and then saved as the master TIFF. The original camera RAW files or DNG files may also be preserved depending on the nature of the project.
- Access copy JPEG files are produced at the same time as the master TIFF files.
Set up copy stand, lights, and laptop computer
- Identify secure location to set up mobile digital photography kit for duration of photography session. The copy stand must be stationed on a flat surface near a power supply for the laptop computer and lights. The laptop, Canon T6i digital camera, and accessories must be stored in secure storage when not in use.
- Set up copy stand.
- Set up lights and laptop computer.
- Turn on lights and make preliminary adjustments as necessary.
Set up digital camera
- Mount digital camera on copy stand.
- Turn on laptop computer.
- Tether camera to laptop computer using the camera's USB cable.
- Launch Canon EOS Utility v3.8.2 for Windows.
- Turn on Canon T6i digital camera.
- Use the Canon EOS utility to apply digital camera settings as follows:
Camera option | Setting | Rationale |
|---|---|---|
| Compression | RAW + JPEG | The camera saves two files for each shot. The camera JPEG is only intended to support visual inspection during the digitization process. Normally the camera JPEG will be discarded and replaced with a JPEG derived from the master TIFF file that is produced from the camera RAW file. |
| ISO | ISO 100 | ISO 100 is the base ISO setting for the Canon T6i digital camera. The "base ISO" of DSLR cameras usually produces the camera's best signal-to-noise ratio and allows the sensor to achieve its full dynamic range. |
| Aperture | f/3.5 | A good default aperture is one or two steps above the lowest f-stop number (i.e., one or two steps below the widest lens opening) allowed by the lens. Depending on the lens this could fall between f/3.5 and f/5.6. The lowest f-stop number of the Canon EF-S 35mm f/2.8 macro IS STM lens is f/2.8, so the default is f/3.5. Some situations may require an aperture of f/4.0. |
| White balance | Auto white balance | White balance can be corrected in post-production. If post-production correction is not desired and the auto white balance setting produces unsatisfactory results, the Canon T6i camera can also be set to a daylight white balance setting if the shoot involves 5500 K lighting, or a white flourescent light white balance setting if the shoot involves standard flourescent lighting (4000 K). See colour temperature for more information. |
| Shutter speed | 1/80 | Could be 1/200 |
| Exposure compensation | 0 | |
| Metering mode | Evaluative metering mode |
Conduct a herbarium specimen photography session
In general, a "photography session" can comprise an entire batch of images shot in a day. A single day of photography could also involve one or more photography sessions (e.g., a morning session and afternoon session). Images from each photography session should be organized into sub-folders to facilitate post-production work.
Establish destination folder
- In the Canon EOS utility, click on the folder icon to launch the Preferences window.
- Navigate to the Destination Folder tab.
- Check the "Remote Shooting" box and then click on the "Customize..." button.
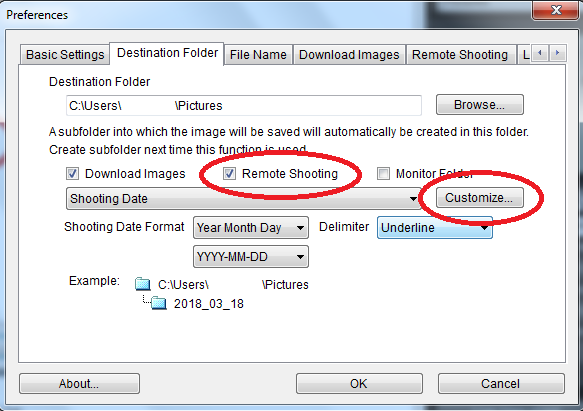
- Use the Customize name window to set the destination folder for the photography session. The desired destination folder name should be:
- C:\Users\[Username]\Pictures\<Shooting Date>\<Session Number>
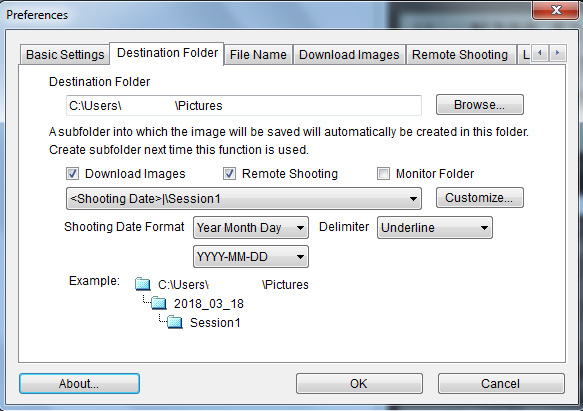
- For example:
- C:\Users\[Username]\Pictures
- 2018_03_18
- Session1
- Session2
- 2018_03_19
- Session1
- Session1
- 2018_03_18
- C:\Users\[Username]\Pictures
- C:\Users\[Username]\Pictures\<Shooting Date>\<Session Number>
- Form the desired destination folder name by using the <Shooting Date> parameter in the first field and \SessionNumber in the second field. For example:

- Click the "OK" button to close the Customize name window. The Destination Folder tab should reflect the desired folder name for the photography session.
Establish file naming conventions
Note: File naming convensions should be based on pre-defined accession identifiers or other unique identifiers whenever possible.
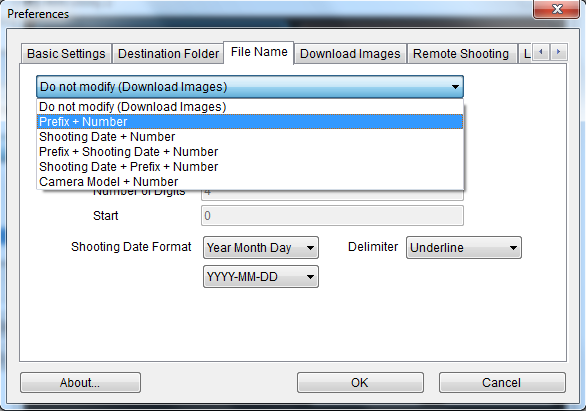
- Navigate to the File Name tab.
- Click on the drop-down menu and select Prefix + Number.
- Enter the Index Herbarorium code for the herbarium (DAL or NSAC). Change the number of digits to 5 and start at 1.
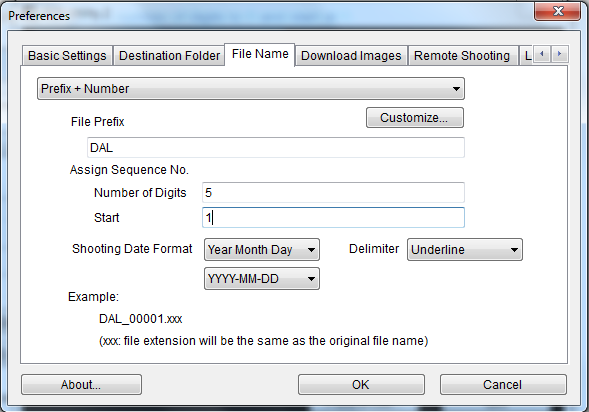
- Click the "OK" button to close the Preferences window.
Take photograph of white balance colour correction card
Note: The white balance colour correction card can be imaged once at the beginning of a project and used to establish a white balance "preset" that can be applied to images from multiple photography sessions. The white balance preset should be updated any time the lighting environment changes (e.g., the lights are moved or new bulbs are purchased).
- Place white balance colour correction card on copy stand.
- Use digital camera viewfinder to preview image. Adjust position of camera and/or white balance colour card as necessary.
- Take photograph of white balance colour correction card.
- Remove white balance colour correction card.
Photograph herbarium specimens and apply conservation treatment as necessary
- Place herbarium specimen on copy stand.
- Use digital camera viewfinder to preview image. Adjust position of camera and/or herbarium specimen as necessary.
- Take photograph of herbarium specimen.
- Review camera JPEG. Adjust position and re-shoot if necessary.
- Delete poor quality RAW and JPEG files before moving onto the next specimen.
- If the specimen requires conservation treatment, apply the treatment. Conservation treatments could include:
- Removing dust and dirt from paper sheets using a smoke sponge.
- Removing yellowed acidic tape and remounting specimen on existing sheet with archival pre-gummed linen tape.Specimens should be humidified prior to remounting and handled with a smooth wooden spatula. Unattached materials such as leaves and seeds should be placed in an acid-free envelope attached to the sheet with archival pre-gummed linen tape.
- Remounting unattached specimens on new sheet. Specimens should be humidified prior to remounting and handled with a smooth wooden spatula. The label and annotation from the old sheet should be transcribed onto the new sheet. Unattached materials such as leaves and seeds should be placed in an acid-free envelope attached to the sheet with archival pre-gummed linen tape.
- Removing dust and dirt from paper sheets using a smoke sponge.
- Do not harm the specimen during conservation. See Project Manager or Libraries' Digitization Coordinator for guidance.
- Re-shoot the treated specimen before moving onto the next specimen.
- Repeat photography and conservation steps until photography session is complete. Each photography session only needs one image of a white balance colour correction card.
Import camera RAW and JPEG files
Note: the camera operator only needs to perform these steps if the camera was not tethered to the laptop computer during the photography session.
- Connect the Canon T6i camera to the computer using the camera's USB cable.
- Turn on the camera.
- In the AutoPlay window that appears, click Import pictures and videos using Windows.
- Tag the photo with the Shooting Date and Prefix. Add an underscore after the Prefix (e.g., 2018_03_18_Herbarium_).
- Click Import. Windows will import the files to a new folder in the Pictures library. Label the folder after the Session Number and move the folder into the correct <Shooting Date> folder.
Return herbarium specimens to permanent storage location
- When a batch of herbarium specimens have been successfully imaged, return the specimens to their permanent physical storage location.